|


Tag Tutorial
Ok let's try some animation this time.
You
will need to have an intermediate knowledge of PSP. I use Corel PSP XI.
Supplies needed:
Corel PSP - Get a Free Trial .:Here:. ;
Alien skin Xenofex 2 Plugin - .:Here:.
Tube © Unknown, received in group share. File name is intact. .:Moon Witch:.
Download and save to your tube folder.
.:Moon Witch:. PNG file for earlier versions of PSP.
Right Click and save image to your image folder.
.:Dove 1:.
.:Dove 2:.
Click to download files to your hard drive.
Font of your choice. I used "Bernhard Condensed MT" , and .:Adore:.
Let's Get Started

Take this pointer with you to keep track of where you are.
Just click and drag me!
Open a 500x500 transparent layer.
Open the tube, copy, close tube and paste as new layer.
Hide tube layer.
Flood fill layer with color #E2EAFC.
Add a new raster layer. Flood fill white.
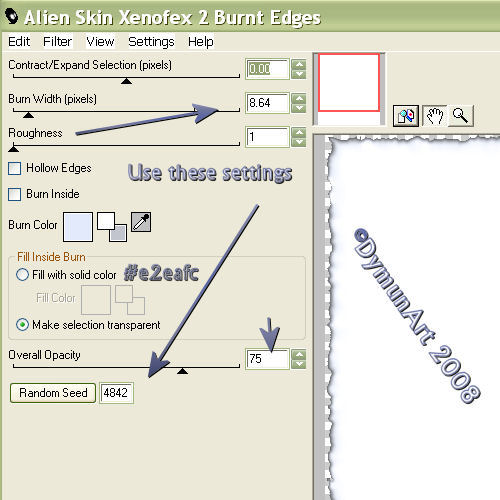
Effects/Plugins/Alien Skin Xenofex 2, apply 'Burnt Edges', see diagram
below for settings.
Merge visible.
Unhide and select the tube layer, add drop shadow with these settings:
Vertical - 3
Horizontal - 1
Opacity - 60
Blur - 5.00
Color - Black
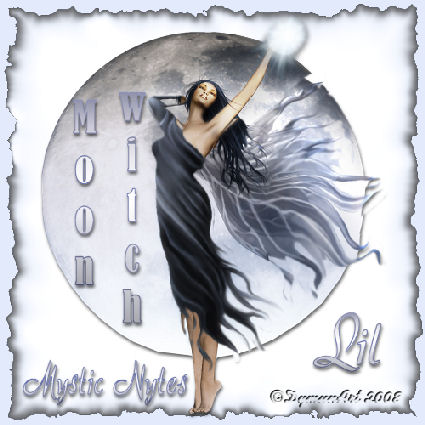
Add your text and copyright info, be sure that it is on a new layer. I used 'Berhard MT Condensed' for Moon Witch and 'Adore' for the remainder. (See my tag for an example of text placement.)
Now, if anyone dares not to add the bing and animate this tag, you may merge and flatten all layers and save as a jpeg. Otherwise, please continue.
ANIMATION
Now comes the fun part!
Hide all layers but your tube layer.
With the tube layer active,
(I zoom in [148%] to make outlining easier),
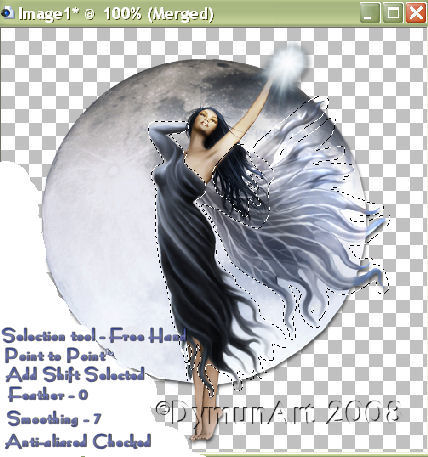
use the 'Selection' tool to outline the dress, then the hair on the tube.
Outline the dress and hair separately.
See the diagram below for the tool settings.
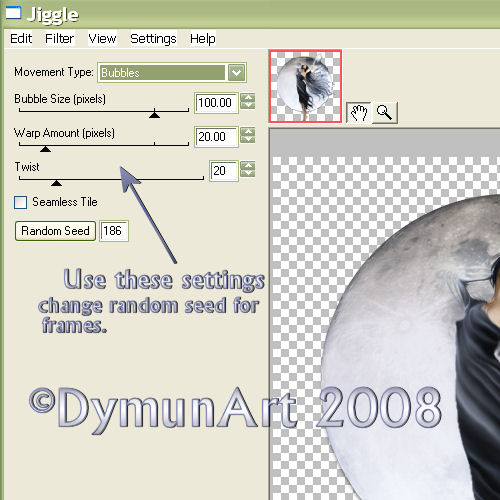
Effects/Plugins/Eye Candy 4000
Apply the Jiggle affect, click random seed once. (see diagram below)
Selections/selcect none.
Activate the selection tool and using the circle shape, draw a circle around
the energy ball. (see below)
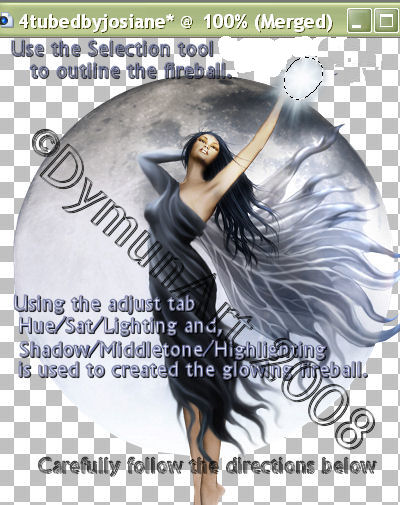
Adjust/Hue and Saturation,
Hue/saturation/lightness;
20/ 3/ 12
Selections/select none.
Unhide all layers, merge and flatten.
Edit/copy.
Open Animation Shop, Edit/paste as 'new animation'.
Back to PSP. Use the back button to go back to before you applied the jiggle.
Now apply clicking the random seed button again. (Pick the one that looks the best.)
Selection/select none.
Get the Selections tool again and draw a circle around the energy ball.
Adjust/Hue and Saturation
Hue/saturation/lightness;
20/ 10/ 3
Selections/select none.
Unhide all layers, merge and flatten.
Edit/copy.
Back to AS, Edit/ paste after current frame.
Back to PSP.
Use the back button to the marching ants around the dress and hair.
Apply the jiggle with another random seed.
Selections/select none.
Get the Selections tool again and draw a circle around the energy ball.
Adjust/Brightness and Contrast
Highlight/Midtone/Shadow
50/ 20/ 3
Selections/select none.
Edit/copy
Back to AS, paste after current frame.
Now open Dove (left) gif file and Propagate paste to the left side of the tag. (Don't be concerned about the 15 frames, you may delete the remaining 12 frames or leave them; the animation will still work.)
Edit/Select all
Select 'Propagate paste'
Place cursor on image in frame 1 and drag to frame 1 of tag for placement.
(See diagram below)
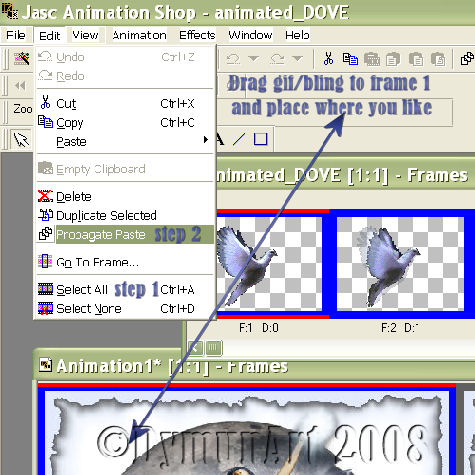
(Be sure that only frame 1 of the tag is active, also have the second frame viewable to make sure your pasting is correct).
Click on the 'view' animation tab to test animation.
Open Dove (right) gif file and Propagate paste to right side of tag and repeat the previous procedure.
(You may now add additional bling as desired)
Click on the animation tab then animation properties.
Set animation speed to 15. and "save as a gif" file.
You're Done!! I hope you like!
I hope you enjoy this tag as much as I enjoyed creating it.
Hugz N' Luv
Lil
This tutorial is created and written by me. Any resemblance to another is totally coincidental and unintentional. This tutorial is to be used for non-commercial purposes only. You may share this tutorial in PSP groups. Tubes used here were obtained from group shares. All copyrights belong to the
original creators.
Moon Witch Tutorial © Lil Dymun/DymunArt
June 23, 2008, all rights reserved.
Back to Top
Please send me your results to post for others to see. I'll link to you if you wish.
Contact
Try my © Screen Gems © A Fairy Pool and © Cool Diva & copy;Be My Valentine Tutorials


Home |About
Me | Awards | Blog | Chat
Room | Clip
Art | Copyright | Contact | Fun Stuff | Gifts |
Memberships | MySpace | Privacy Statement | Scrap Kits | Site
Map | Stationary | Tags | Terms Of Use |
Top Site |
Tutorials | Vote
(OSVP) | Websets
|