|

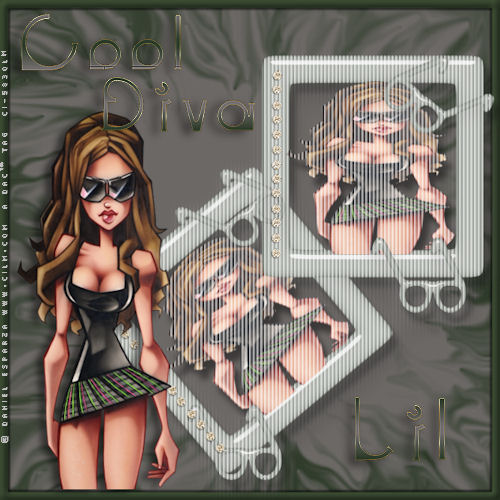
Tag Tutorial
This is my first tutorial. I wanted to create
something that would be a little different from the norm.
You
will need to have an intermediate knowledge of PSP. I use Corel PSP XI.
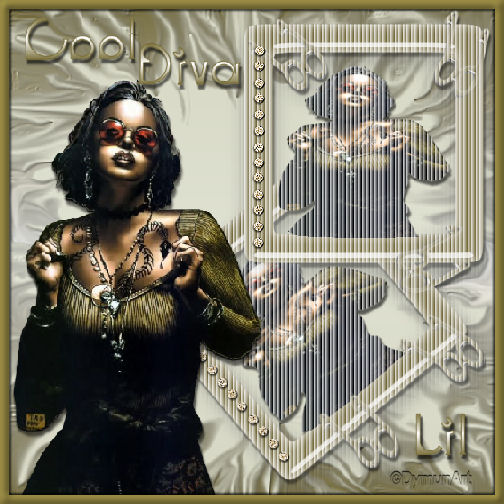
In this tutorial you will be creating the picture frame and frame
accents for this tag.
Supplies needed:
Corel PSP - Get a Free Trial .:Here:. ;
Alien skin Eye Candy 5 Impact Plugin - .:Here:.
Fire .:Mask:. Right click and save
to your mask folder.
.:Diamonds:.
Click to download tube to your hard drive.
Tube of your
choice
Font of your choice. I used "Slide" @ 75 pixels.
Let's get started!
You make take this pointer along with you to keep track of
where you are.
Just click and drag the pointer!
Open a blank transparent canvas 600x600 pixels. Open your tube copy
and paste as new layer, resize if necessary.
Choose a dark color from
your tube and flood fill the canvas.
Selections/Select all/Modify/Select
Selections Borders/Inside selected/width = 80/Invert/delete/Select
none.
Next click on Image/Resize = 50%; (resize all layers
'unchecked').
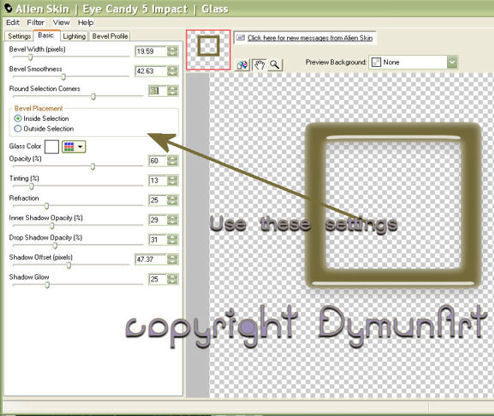
Go to 'Effects'/Alien skin Eye Candy 5
Impact/Glass, [see diagram below and apply the settings
shown].
Duplicate
layer. Move Frame 1 to the top right of your canvas. Move the 2nd frame to
form a 'chain type' link with Frame 1.
Activate your tube layer.
Edit/Copy.
Activate the Magic wand tool with these settings: Mode(Add Shift); Feather(0); Anti-alias(checked).
Activate Frame 1. Click inside Frame 1.
Selections/Modify/Expand= 20.
Edit/Paste into
selection/Select none.
Repeat for Frame 2.
With Frame 2
active, go to,
Image/Free rotate/Left/40 Degrees.
Merge the 2
frames only.
Click on the Preset shape tool. Choose an
embellishment to compliment your tag. (I chose the glasses for
mine.)
On the materials palette have the dark color from your tube
in the foreground and the background 'null' or a color/gradient of
your choosing.
(Note: The preset tool creates a 'vector' layer, convert
to raster before applying the filter.)
Create your accents and apply the
Eye Candy Glass effect using the same settings as the frame.
Duplicate as many layers as you need and place your accents on the frame. Merge these
layers.
Now, with your tube layer hidden and the frame layer
active, go to
Effects/Texture effects/Blinds; and apply these
settings:
Width - 5
Opacity - 75
Color -
White
Horizontal and Light from left/top 'unchecked'.
Click
OK.
Open Diamond string tube, Copy and paste string onto
Frame 1. Place on left side of frame.
Duplicate layer rotate left 40
Degrees and place on Frame 2. Merge these two layers onto the
frame.
(Note: You should have 2 layers, your tube and the
frames.)
Layers/New raster layer/;
Select a light color from
your tube and flood fill the canvas.
Layers/Load Mask From
Disk; select the Fire mask provided. (See the diagram below and
apply these settings).
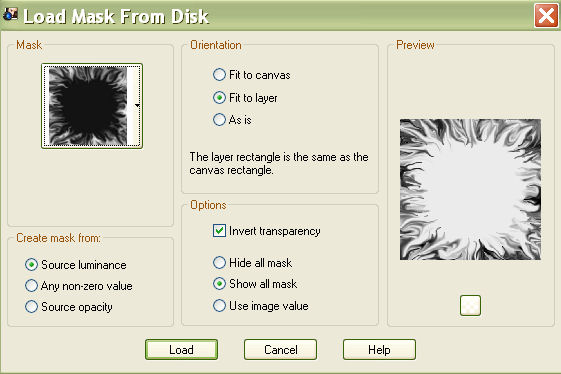
Layers/merge
group.
Layers/New raster layer;
flood fill with dark color from tube or other color/ gradient of
choice. Move this layer to the bottom.
Merge the mask and bottom
layer.
Activate the frame layer and add drop shadow of choice.
Activate your tube layer, add drop shadow of choice.
Layers/merge
visible.
Go to Image/Add borders, all sides 'checked' size = '9',
color = 'white'.
Selections/select all/Modify/Select selections
borders; Inside 'checked', Anti-alias 'unchecked', border width = '9'.
Click Ok, then hit delete on your keyboard. Flood fill the space with
the dark color from your tube.
Effects/3D effects/Drop shadow
with these settings:
Vertical '2', Horizontal '2', Opacity
'70', Blur '3.00', color 'Black';
repeat the drop shadow with
these settings:
Vertical '-2', Horizontal '-2', Opacity '70', Blur
'3.00' color 'black'.
Effects/3D effects/Inner Bevel (see diagram
below and apply these settings.)
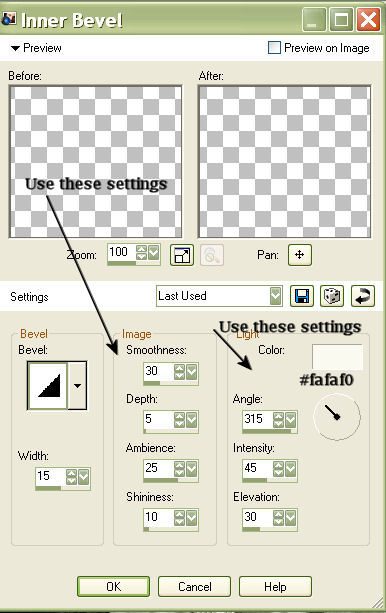
Selections/Select None.
Now for the
finishing touch add your text and copyright info and resize if desired; 'save
as' Jpeg.
I hope you enjoy this tag as much as I enjoyed creating it.
Hugz N' Luv
Lil
This tutorial is created and written by me. Any resemblance to another is totally coincidental and unintentional. This tutorial is to be used for non-commercial purposes only. You may share this tutorial in PSP groups. Tubes and Mask used here were obtained from group shares. All copyrights belong to the original creators.
Cool Diva Tutorial © Lil Dymun/DymunArt
February 20, 2008, all rights reserved.
Back to
Top
Please send me your
results to post for others to see. I'll link to you if you wish.
Contact
Try my© A Fairy Pool © Be My Valentine © Screen Gems and © Moon Witch Tutorials


Home |About
Me | Awards | Blog | Chat
Room | Clip
Art | Copyright | Contact | Fun Stuff | Gifts |
Memberships | MySpace | Privacy Statement | Scrap Kits | Site
Map | Stationary | Tags | Terms Of Use |
Top Site |
Tutorials | Vote
(OSVP) | Websets
|