This is a Signature Tag tutorial created in Corel Paint Shop Pro Photo XI.
I hope you enjoy this tutorial.
Please send me your finished tag. I would love to see your results!!
Contact me via the link at the bottom of this page.
What's needed:
An Intermediate knowledge of PSP;
Corel PSP - Get a Free Trial .:Here:.
Alien skin Eye Candy 4000 Plugin .:Here:.

Supplies
Scraps, Mask, Gradient, Pattern, Font and Word Art are included in the supplies
File size: 2.01mb
Now Let's Get Started!

You are welcome to take this pointer with you,
You can keep track of where you are
(just click and drag).
Open a blank canvas 550x433, flood fill with gradient Barn Red, angle 30, repeats 0, style radial (the 4th one)
Adjust/Blur/Gaussian Blur/Radius 15.00
Open tube SS_1005_Misted, Edit/Copy and close the tube. Edit/Paste as new layer.
Image/Resize/60%, all layers:unchecked. Move to upper left corner of canvas.
Layers/Properties - set 'Blend mode' to 'Soft Light' and 'Lock Transparency'.
Open tube 156_monique. Edit/copy, close tube. Edit/Paste as new layer. Image/Resize/80%, all layers:unchecked. Adjust/Sharpness/Sharpen More. Effects/Drop Shadow: V-3, H-0, Opacity-60, Blur=5, Color-Black.
Open tube Two Roses, Two Glasses; Edit/copy and close tube. Edit/Paste as new layer. Image/Resize/70%, all layers:unchecked.
Activate the bottom layer (gradient layer). Layers/Load Mask form disk (or load mask from image if the image is open on your workspace) vdaymask4.gif, use these settings: Source Luminance; Fit to Canvas; Invert transparency:checked; Show all Mask.
Layers/Merge/Merge Group. Layers/New raster layer. Move to the bottom of the layers palette. Flood fill with color #ad4a5a. Layers/Merge/Merge Visible.
Get the text tool and type your name with the heart font provided in the supplies, pixel size 85 (or smaller if you have a long name).
Place name in the left bottom corner of tag (see my tag for example). Add drop shadow Effects/3D Effects/Drop Shadow: V-1, H-0, Opacity-70, Blur-0, Color-Black.
Effects/Plugins/Alien Skin Eye Candy 4000/Impact/Glass - See diagram below for settings.

Effects/3D Effects/Drop shadow/V-8,H-0, Opacity-50, Blur-9, Color-Black.
Open the Word Art tube. Edit/copy, close the tube; Edit/Paste as new layer. Move to the upper right corner of the tag. (See my tag for example.)
Image/Add Borders : color-white, size-3px, Symmetric-checked. Layers/Promote Background Layer. Selections/Select All. Selections/Modify/Select Selection Borders: width-3.
Hit delete on your keyboard. Flood fill selection with gold Pattern 'Arguld 10', angle-30, scale-100.
Effects/3D Effects/Drop shadow/V-1, H-1, Opacity-100, Blur-0, Color-Black. Repeat drop shadow, change V and H to -1. Selections/Select None.
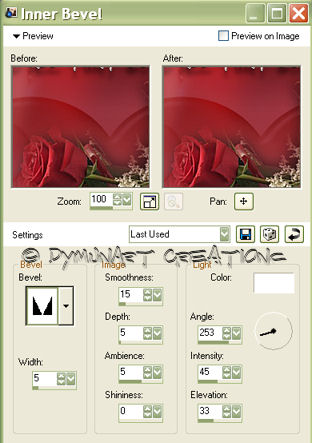
Image/Add Borders:White, size-5px, symmetric-checked. Layers/Promote Background Layer. Selections/Select all. Selections/Modify/Select/Selection Borders: border width-5px. Hit delete. Flood fill selection with gradient 'Barn Red' angle-30, repeats-7. Effects/3D Effects/Inner Bevel (See diagram below for settings)
Selections/Select None. Image/Add Borders: size-3px, color-white, symmetric checked. Layers/Promote Background Layer.
Selections/Select All. Selections/Modify/Selection Borders; border width-3. Hit delete. Flood fill selection with pattern 'Arguld 10' with the same settings as above. Selections/Select None.
Image/Add Borders: width-9, color-white, symmetric-checked. Layers/Promote background layer. Selections/Select All. Sections/Modify/Select Selection Borders: border width-9. Hit delete. Flood fill selection with gradient 'Barn Red'.
Effects/3D Effects/Drop Shadow: V and H 1, opacity 100, blur 0, color black. Repeat drop shadow and change V and H to -1. Selections/Select None.
Image/Add Borders size - 5px , color - white, symmetric-checked. Layers/Promote background layer. Selections/Select All. Selections/Modify/Select Selection borders: border width-5. Hit delete. In the Materials palette change the angle to 50 and scale to 55 for the pattern 'Arguld 10', flood fill the selection, Selections/Select None.
Adjust/Sharpness/Sharpen. (You may resize now if you want the tag smaller) Save as a .jpeg/jpg file.

This tag was animated using the techniques covered in my 'A Fairy Pool' and 'Be My Valentine' tutorials. Click the links on the menu at the top of this page and try them out.
This tutorial is created and written by me. Any resemblance to another is totally coincidental and unintentional. This tutorial is to be used for non-commercial purposes only. You may share the link to this tutorial in PSP groups.
Burgundy Valentine Tutorial © Lil Dymun/DymunArt™ Creations Jan 11, 2009 all rights reserved.
Back to Top
Contact
Try my © Screen Gems © Moon Witch © Cool Diva © Be My Valentine & A Fairy Pool Tutorials


Home |About Me | Awards | Blog | Chat Room | Clip Art | Copyright | Contact | Fun Stuff | Gifts | Memberships | MySpace | Privacy Statement | Scrap Kits | Site Map | Stationary | Tags | Terms Of Use | Top Site |Tutorials | Vote (OSVP) | Websets
Site background, images, and Layout © DymunArt™Creations, please do not copy or remove images without written permission from the webmistress. |