This is an animated Signature Tag tutorial created in Corel Paint Shop Pro Photo XI and EZ Gif Animator.
I hope you enjoy this tutorial.
Please send me your finished tag. I would love to see your results!!
Contact me via the link at the bottom of this page.
What's needed:
An Intermediate knowledge of PSP;
Corel PSP - Get a Free Trial .:Here:.
Alien skin Eye Candy 4000 Plugin .:Here:.
Center piece tube - Couple tube obtained via group share
Accent tube © DymunArt™ Creations
Font - Londonderry Air NF
Here are links for animation software:
Animation Shop 3
EZ Gif Animator
Ulead Gif Animator

Supplies
Tubes, Mask, Pattern and Font are included in the supplies
File size: 2.77mb
Now Let's Get Started!

You are welcome to take this pointer with you,
You can keep track of where you are
(just click and drag).
Open 500x500 px canvas, flood fill with Pattern BWS836~DW1 with these settings: Angle 0, Scale 100.
Open the couple tube, Image/Resize 70%, All layers - unchecked. Adjust/Softness/Soften More. Place tube in the center of the canvas.
Activate the bottom layer then click in Layers/New Raster Layer. Selections/Select All; Selections/Modify/Select Selection Borders - inside ticked, border width=10. Effects/3D Effects/Drop Shadow V and H 1, opacity 70, blur 3, color black. Repeat drop shadow changing V and H to -1. Selections/ Select None.
Layers/New Raster Layer. Get the Selections tool, Selection type: Rectangle, Mode: Replace, Feather: 0. Draw a rectangle leaving a space of approximately 20-25px from the inside border of the frame below.
Apply the same drop shadow effect as the frame below. Selections/Modify/Select Section Borders; inside ticked, border width=5. Apply the same drop shadow again.
Selections/Select None. Layers/Merge/Merge Down. Effects/3D Effects/Buttonize H=47, W=64, opacity=38, transparent-checked, color=white.
Now click on the top layer (the couple tube). Open the Pearl Divider tube. Edit/copy. Close the tube. Edit/paste as New Layer. Place the accent below the Couple, (see my tag for example).
Layers/Merge/Merge Down.
Get the text tool; in the Materials Palette set the foreground to color=#da969c and background to color=#f9eef1.
Font - 'Londonderry Air NF sizw:55 Bold anti-alias:Smooth Stroke width:1. Type your text and place right above the couple. (Squeeze the text to fit inside the inner frame if necessary)
Layers/Convert to Raster Layer. Effects/Plugins/Alien Skin Eye Candy 4000/Impact/Glass; see diagram below for settings: 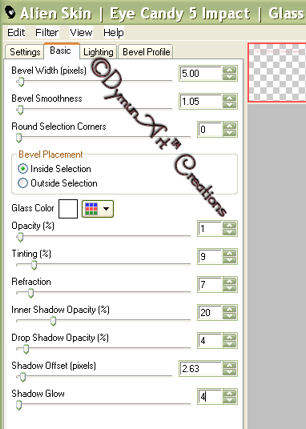
Adjust/One Stop Photo Fix. Effects/3D Effects/Drop Shadow with these settings: V 5, H 0, Opacity 50, Blur 9, Color black.
Add you name and copyright info if applicable. Close the bottom (Flower pattern) layer. Click on the top layer. Layers/Merge/Merge Visible. Duplicate this layer 2 times.
Get the white sparkle tube with the tube tool and place sparkles on the roses (and the Pearl divider if you wish to) in different places on these 3 layers.
Close off all 3 tube layers.
Making the KaleidoscopeNOTE: If you do not want to make the Kaleidoscope use the Template provided in the supplies, just paste each layer to the canvas and follow the **assembly instructions below.
If you are using your own background pattern then you may want to create your own Kaleidoscope, just use a bottom border mask.
Layers/New raster layer. Make sure this layer is below the tube layers.
In the Materials Palette select the flower pattern again with these settings: Angle 0, Scale 50. Flood fill the new layer.
Layers/Load Mask from disk - burngardendworish_small.jpg (New Mask Layer if you have the mask image open on your workspace), use these settings: All of these ticked - Source Luminance, Fit to Canvas, Invert Transparency, and Show All Mask; color white.
Layers/Merge/Merge Group. Duplicate this layer 2 times. Effects/Reflection Effects/Kaleidoscope; see the diagram below for settings apply to the first mask layer, 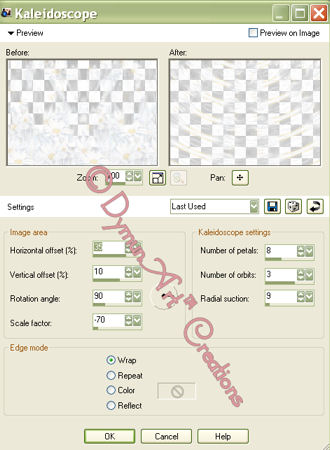
Apply the effect to the next two layers changing the 'Radial Suction' to 7 and then 5. Click on the 2nd Kaleidoscope layer; Image/Free Rotate - Right 18 degrees, all layers unchecked. Do the same with the 3rd layer changing direction to 28 degrees.
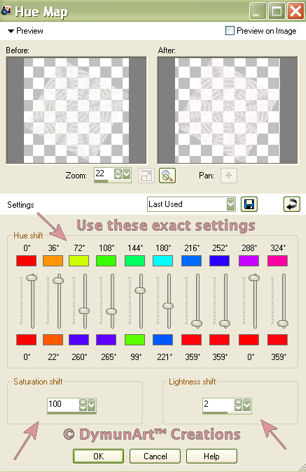
Click on the 2nd Kaleidoscope layer. Adjust/Hue and Saturation/Hue Map; see diagrams below and apply the exact settings diagram 1 to the 2nd layer and diagram 2 to the 3rd layer. 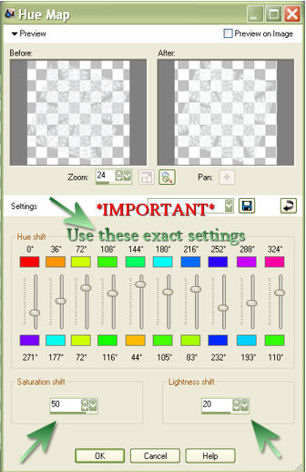
Now click on the bottom (background) layer and activate it (open it if it is closed). Duplicate this layer 2 times.
**You now have nine layers, 3 framed tube, 3 kaleidoscope, and 3 backgrounds.
Click on the top layer. Close the 2nd and 3rd layers. Now close the 2nd and 3rd kaleidoscope layers. Now close the 2nd and 3rd background layers.
Layers/Merge/Merge Visible. Now close the top (merged) layer. Click on and open the 2nd layer of each group. Layers/Merge/Merge Visible. Repeat with the last group of layers.
You now have 3 layers which are your 3 frames for animation. Click on your first frame. Edit/copy. Open your favorite Animation editor and click on Edit/Paste as new animation.
Go back to PSP and repeat the Edit/Copy with the 2nd frame. Paste into the animator as a 'new frame' or 'after current frame'; then the 3rd frame.
Set the frame speed in the animation properties to 20 and save as .gif file.
Thanks for trying my tutorial. Please send me your results to post on my artists results page.
If you provide your web page or group link I will link to your site.
This tutorial is created and written by me. Any resemblance to another is totally coincidental and unintentional. This tutorial is to be used for non-commercial purposes only. You may share the link to this tutorial in PSP groups.
Springs Passion Tutorial © Lil Dymun/DymunArt™ Creations
Jan 22, 2009 all rights reserved.
Back to Top
Contact
Try my © Screen Gems © Moon Witch © Cool Diva © Be My Valentine & © A Fairy Pool Tutorials


Home |About
Me | Awards | Blog | Chat
Room | Clip
Art | Copyright | Contact | Fun Stuff | Gifts |
Memberships | MySpace | Privacy Statement | Scrap Kits | Site
Map | Stationary | Tags | Terms Of Use |
Top Site |
Tutorials | Vote
(OSVP) | Websets
Site background, images, and Layout © DymunArt™Creations, please do not copy or remove images without written permission from the webmistress.
|